Part 5: Post-Processing Effects
Introduction
Post-processing is a way to make your game look better by adding special effects after the scene has been rendered. You can use it to enhance visual details like brightness, depth, and color.
What Are Post-Processing Effects?
Post-processing effects are visual tweaks that improve your game's appearance after it's rendered. These effects can change how colors and lights look, and help set the right mood. Common effects include adding a glow around lights (bloom), adjusting colors (color grading), and making distant objects blurry (depth of field).
Common Post-Processing Effects
Here are some effects you can use in Highrise Studio:
- Bloom: Makes bright areas glow.
- Color Adjustments: Changes the overall colors and tones.
- Chromatic Aberration: Creates a color-fringing effect to mimic camera lenses.
- Depth of Field: Blurs objects that are out of focus.
- Film Grain: Adds a film-like texture.
- Lens Distortion: Bends the image to simulate camera lens effects.
- Motion Blur: Blurs moving objects to give a sense of speed.
- Vignette: Darkens the corners of the scene.
- Tonemapping: Adjusts how colors and brightness are handled.
- White Balance: Changes the color temperature.
Setting Up Post-Processing
To use post-processing in your scene, follow these steps:
- Right-click in the Hierarchy window and select
Create Empty. - Name the new GameObject
Post Processing. - In the Inspector window, click
Add Component, search forVolume, and add it. - Press
Newto create aPost Processing Profile. - Click
Add Overrideand pick the effects you want.
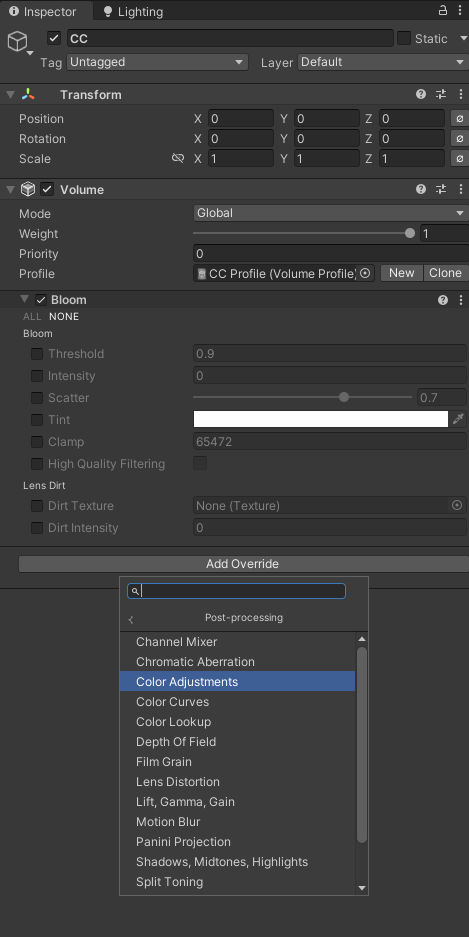
Make sure your scene has a camera with
Post Processingenabled to see the effects.
Managing Effects
Adjust and fine-tune your effects in the Post Processing Profile via the Inspector window. Here, you can turn effects on or off, set their strength, and modify how they look to get your scene just right.
Always view your adjustments in the Game View to see changes as they happen.
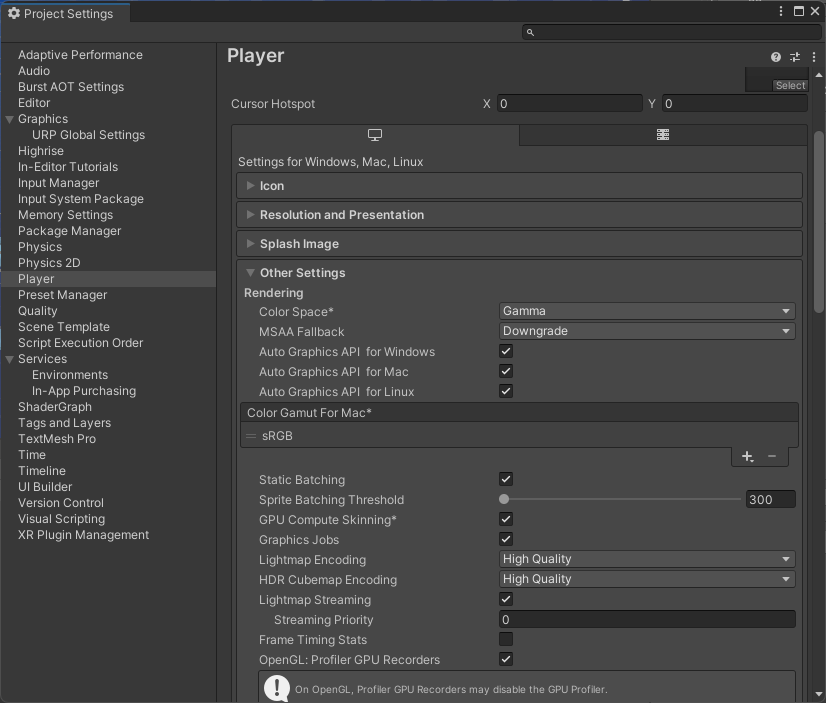
Project Settings
For post-processing to work properly, set your project’s color space:
- Go to
Edit>Project Settings. - Choose
Player, then scroll to Other Settings. - Check that
Color Spaceis set toGamma. If not, change it toGamma.
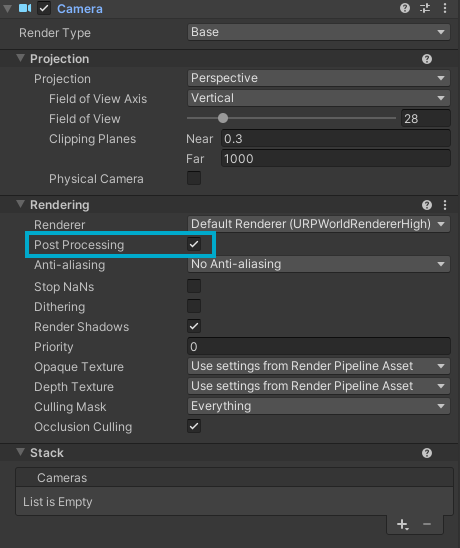
Camera Settings
Make sure your camera is ready for post-processing:
- Select your camera in the scene.
- Find the
Post Processingcomponent in the Inspector and check theIs Enabledbox.
Conclusion
Experiment with different post-processing effects to find what best enhances your game. These effects can dramatically improve how your game feels and looks, making your scenes more immersive and visually appealing.
- Lecture 11: Spawn Points will show you how to set up spawn points for characters.

